
How to solve problems with notifications in JivoChat application on mobile devices
Push-notifications on iOS
Apple Push Notification service (APNs) is responsible for sending of notifications on iOS.
Transferring of Push-notifications is controlled by Apple. Problems come up in connection with weak or unstable signal. Also the reason could be that a power saving mode is enabled.
In order to solve the problem, make sure that:
1.Your iOS version is the latest.
2.JivoChat application has the latest update from AppStore (TestFlight for the beta-tester)
3.Set the sound to an appropriate level. (Silent mode should be disabled)
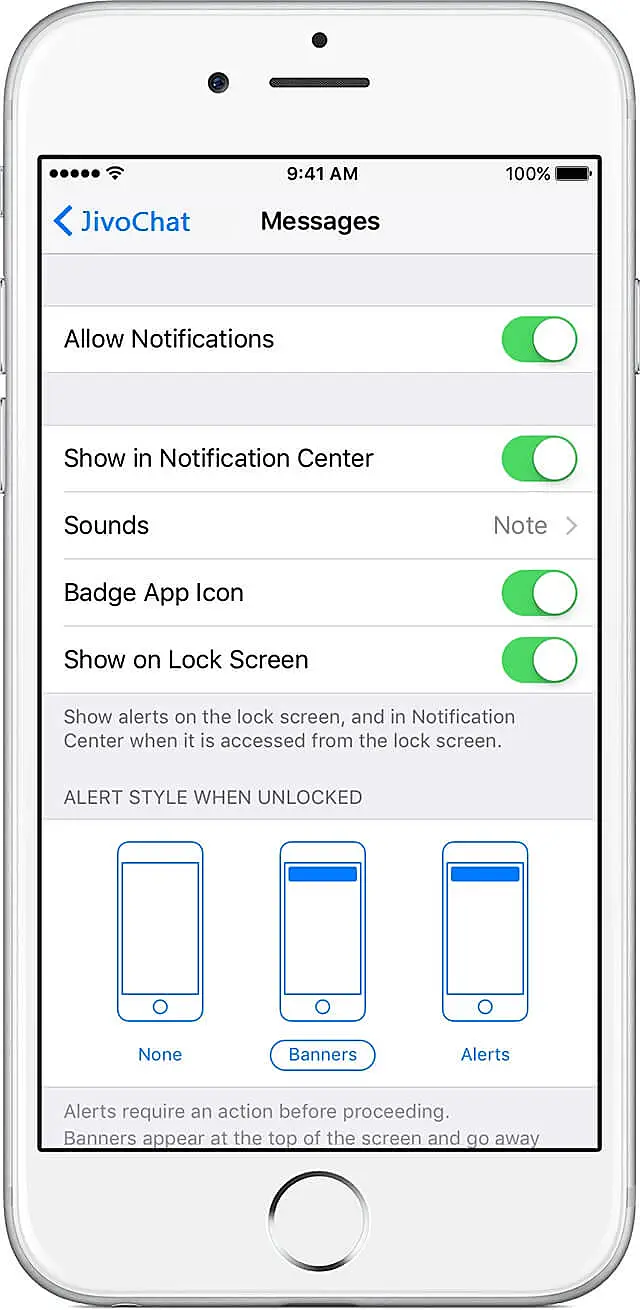
4.Check next settings for the JivoChat app:
5.If you use unlocked iPhone, check settings for the Access Point Names (APN).
Anyway contact your mobile network operator which should provide this information.
Push-notifications on Android
Push-notifications delivery is being proceeded from Push-servers via Google Play Services. If you stopped getting push-notifications from JivoChat and other apps the reason might be the loss of connection to push-servers. To recover the connection you can:
-
Turn the Wi-Fi or mobile internet off and then on again;
-
Reload the device: turn the phone off and then turn it on again;
-
Change the connection type: switch from Wi-Fi to mobile internet or vice versa;
-
Make sure that "Do not disturb" mode is off.
In other cases, when the only application you are not getting push-notification from, is JivoChat, push-notifications aren't being delivered because of the device settings: power saving mode, background execution limits, autorun for application might be blocked, etc.
Common Android settings that should be checked_
-
Make sure that "Do not disturb" mode is off and the sound is turned on.
-
Check the notifications for JivoChat and Google Play Services applications: Settings -> Apps -> JivoChat/Google Play Services -> Turn notifications on - Checkmark.
-
Make sure that "Background execution limits" option is turned off for JivoSite and Google Play Services apps: Settings -> Data usage -> Menu or Settings -> Apps -> JivoChat/Google Play Services -> Data usage.
-
Make sure JivoChat and Google Play Services apps has all the needed access: Settings -> Apps -> JivoChat/Google Play Services -> Access.
-
Check if "Auto-sync data" option is enabled: Settings > Data usage > Menu > Auto-sync data.
-
Check the "Keep Wi-Fi connection on in sleeping mode" option: Settings -> Wi-Fi -> Menu -> Additional features -> Wi-Fi in sleeping mode. It should be set up to Do not disable.
-
Some devices have the feature to optimize Wi-Fi connection: _Settings > Wi-Fi > Menu > Additional features >Wi-Fi optimization, it should be enabled.
-
Turn off the battery optimization feature: Settings -> Battery -> Battery optimization -> "Show all applications" > JivoChat > Do not optimize.
Please note:
-
If the application was shut down manually, you will not get notifications until you re-run it manually again (these are Android restrictions).
-
Task killer, antivirus, firewall and tweaker applications can affect the JivoChat application.
-
In the power saving mode applications can disable notifications.
Also, in Android phones of various brands, additional settings from the manufacturers of smartphones are often added. Especially it concerns the Chinese manufacturers - Huawei, Xiaomi, Zte, etc., in the Chinese market the work of Google Play is forbidden - hence the quantity of the settings that regulate the work of push notifications. Consider these settings for popular brands below.
Asus Zenfone (Android 7.0)
Step 1: Ensure that JivoChat is set to auto-start
- From the app drawer, tap Settings.
- Tap Power Management.
- Select Auto-start Manager.
- Find JivoChat and ensure it's enabled.
Step 2: List JivoChat as a protected app
- From the app drawer, tap Mobile Manager.
- Tap Boost.
- Tap Enable Super Boost, then select Protected app list.
- Verify that JivoChat is on the list.
Asus Zenfone 2
Make sure that JivoChat is allowed to begin on startup from your Auto-start manager:
- From the app drawer, tap Apps.
- Tap Auto-start manager.
- Toggle JivoChat to Allow.
Huawei Honor 6
Step 1: List JivoChat as a protected app
- From the app drawer, tap Settings.
- Tap Power Saving.
- Tap Protected apps.
- Toggle JivoChat to enable.
Step 2: Enable JivoChat in the Notification Manager
- From the app drawer, tap Settings.
- Tap Notification Manager.
- Select Notify for JivoChat to receive push notifications.
Huawei Honor 8
Step 1: List JivoChat as a protected app
- From the app drawer, tap Settings.
- Tap Advanced Settings.
- Tap Battery Manager.
- Tap Protected apps (or Close apps after screen lock).
- Toggle JivoChat to enable.
Step 2: Ignore battery optimizations for JivoChat
- From the app drawer, tap Settings.
- Tap Apps.
- Tap Advanced.
- Select Ignore battery optimizations.
- Choose JivoChat and ignore the app.
Step 3: Allow notifications from JivoChat
- From the app drawer, tap Settings.
- Select the Notification Panel & Status Bar.
- Tap Notification Center and find JivoChat.
- Ensure that Allow Notifications and Priority Display are active.
Huawei P8 lite
Step 1: Enable JivoChat to run at startup
- From the app drawer, tap Phone Manager.
- Swipe left and tap Startup Manager.
- Tap JivoChat and ensure that it's set to run automatically at system startup.
Step 2: Allow notifications from JivoChat
- From the app drawer, tap Phone Manager.
- Swipe left and tap Notification Manager.
- Tap Rules and ensure that JivoChat is set up to send notifications to the notification panel. Check if any other settings in this view may be blocking notifications.
Huawei Mate 8 & Huawei Nova Plus
Ensure that JivoChat is exempt from your device's battery optimization features:
- From the app drawer, tap Settings.
- Tap Advanced Settings.
- Tap Battery Manager.
- Tap Protected apps.
- Toggle JivoChat to enable.
Huawei P20 & P30
- From the app drawer, tap Settings.
- Tap Apps.
- Tap JivoChat.
- Select Power usage, followed by App launch.
- Toggle Manage automatically to Off.
- Then, toggle Auto-launch, Secondary launch, and Run in Background to On.
LeEco/LeTV
Step 1: Enable JivoChat to run at startup
From the app drawer, tap Settings. Tap Permissions. Tap Manage Auto Launch. If you have enabled other apps to auto-launch, you'll see You've enabled [x] apps to auto launch. Toggle JivoChat to enable.
Step 2: List JivoChat as a protected app
From the app drawer, tap Settings. Select Battery, then tap Power saving management. Select App Protection. Toggle JivoChat to enable.
Note: If you have enabled Lock Screen Cleanup and Ultra Long Standby during Sleep, you must disable them to allow JivoChat notifications.
Lenovo
Enable the auto-start setting for the JivoChat app:
- From the app drawer, tap Settings.
- Tap Power Manager.
- Select Background app management.
- Toggle JivoChat to Allow auto-start.
Meizu
- Attach the JivoChat application to the device's RAM (open the Application manager and click the lock icon next to the application).
- Allow the application to run in the sleeping mode: Settings > Device -> Power manage -> Power saving-> Power saving optimization -> Sleeping mode.
- Allow automatic re-run for the app.
- Allow the app to show notifications: Security center > show notifications.
- Add JivoSite to the white list of memory acceleration: Security (apps) > Accelerator > Settings > Memory acceleration white list - add JivoChat.
Samsung
Step 1: Prioritize notifications from JivoChat
- From the device drawer/shade, tap Settings.
- Tap Apps.
- Select JivoChat.
- Under App Setting, tap Notifications.
- Select Messages & Mentions (then Advanced - if Android 9.0 installed)
- Select Do Not Disturb Custom Exception.
Step 2: Exclude JivoChat from battery optimization
- From the app drawer, tap Settings.
- Tap Device management.
- Select Battery.
- Tap Unmonitored apps.
- Add JivoChat to this list.
OnePlus (Android 7.0 and earlier)
For versions earlier than Android 8.0 Oreo, ensure that JivoChat is set to auto-launch:
- From the app drawer, tap Settings.
- Tap Apps.
- Tap the ⚙️ gear icon in the top right.
- Select App Autolaunch.
- Toggle JivoChat to enable.
OnePlus (Android 8.0 and later)
Step 1: Check that app storage is set to clear normally
- From the app drawer, tap Settings.
- Tap Advanced.
- Select Recent apps management.
- Ensure that Normal clear is enabled.
Step 2: Exclude JivoChat from battery optimization
- From the app drawer, tap Settings.
- Tap Battery, then Battery Optimization.
- Tap Apps not optimized and select All apps.
- Find JivoChat and ensure it's set to Don't optimize.
OnePlus 3
Adjust your battery optimization to allow notifications from JivoChat when it's running in the background:
- From the app drawer, tap Settings.
- Tap Battery.
- Select Battery Optimization.
- Tap the (three dots) Overflow menu in the top right of that screen.
- Select Advanced Optimization.
- Toggle JivoChat to off.
OPPO
Step 1: List JivoChat as a protected app
- From the app drawer, tap Settings.
- Tap Advanced Settings.
- Tap Battery Manager, then Protected Apps.
- Toggle JivoChat to enable protection.
Step 2: Ignore battery optimization for JivoChat
- Tap on Settings.
- Select Battery, then tap on Energy Saver.
- Find JivoChat and ensure that Freeze when in Background, Abnormal Apps Optimization and Doze are all disabled.
Step 3: Allow notifications from JivoChat
- From the app drawer, tap Settings.
- Tap Notification Panel & Status Bar.
- Tap Notification Center.
- Find JivoChat and activate allow notifications and priority display.
Step 4: Add JivoChat to start up manager
- Open the Security app.
- Select Privacy Permissions, then Start up manager.
- Find JivoChat and ensure this setting is enabled.
Xiaomi
The manufacturer is known for adding popular applications to whitelists, so most users have notifications from other applications (for example, WhatsApp or VKontakte). What you need to check:
Step 1: Check that JivoChat is given permission to autostart
- From the app drawer, tap Security.
- Tap Permissions.
- Tap Autostart.
- Toggle JivoChat to enable.
Step 2: Ignore battery restrictions for JivoChat
- From the device drawer/shade, tap Settings.
- Select Manage Apps’ Battery Usage.
- Tap Apps.
- Tap JivoChat, then tap No Restrictions.
Step 3: Allow notifications from JivoChat
- From the device drawer/shade, tap Settings.
- Select App Notifications.
- Tap JivoChat.
- Toggle on: Allow sound, Lockscreen notifications, Floating notifications.
ZTE
- Attach the JivoChat application to the device's RAM.
- Disable the battery restrictions for JivoChat in the battery settings: Settings-> Battery -> Save battery power -> All apps -> JivoChat -> Do not save.
- Enable notifications: Settings -> Applications -> JivoSite -> Notifications -> Consider important.
Common connection problems:
-
For a stable connection the device should have both Wi-Fi and mobile internet enabled.
-
When you change your mobile network or Wi-Fi hotspots, your Internet connection may hang. You should turn on / off the flight mode or turn on / off the device.
-
Some public Wi-Fi networks require registration before connecting to the Internet. This can be found in hotels, airports, petrol stations, etc. These connections can be disconnected if the device is in the standby mode. Open the page in a browser and make sure the Internet is available.
-
Some Wi-Fi networks may use a firewall, contact your network administrator to connect.
-
The program may not work when connected through a proxy server or VPN.

